When the vehicle is making strange noises and vibrations, it is a definitive sign that universal joints are failing. To avoid further and more serious damages, learn how to replace U joints in a few simple steps. This is an easy DIY project that won’t take a lot of your time, but it will make your car run smoother.
If you are considering repairing the car on your own, you may wonder What are the symptoms of a bad U joint? or How will you know that your vehicle needs to be fixed? To help you, we made a step by step guide on how to replace this small but essential part of the vehicle.
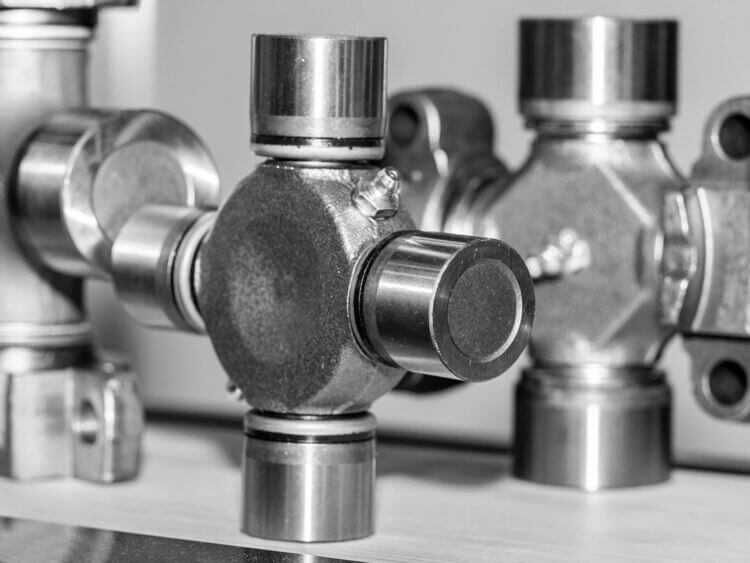
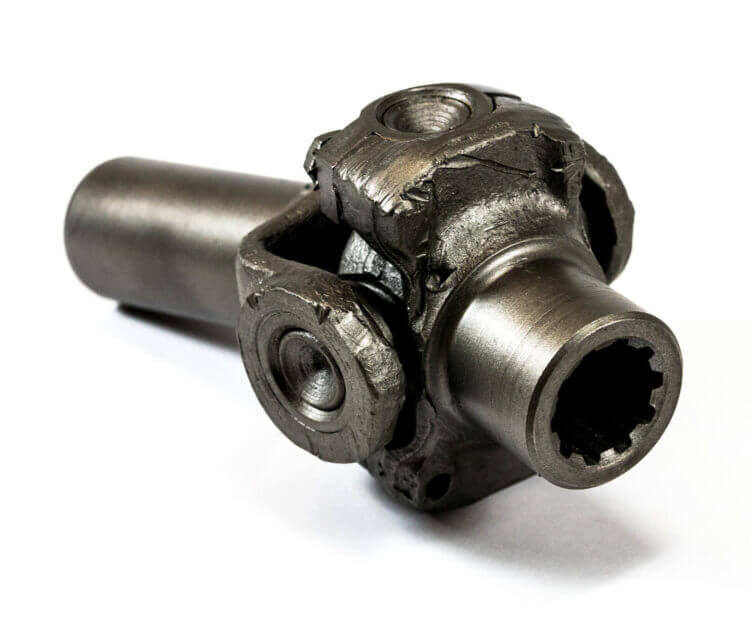
Before you take your tools and start disassembling the vehicle in order to fix universal joints (UJ), let’s go over what exactly this part means for your car. U-joints are small and simple components that haven’t changed much since the first cars. They connect the driveshaft and differential. Occasionally, they attach driveshafts to the transmission or two driveshafts to one another. This cross-shaped piece with a bearing at each end allows lateral and side to side movements of the driveshaft. Basically, it’s enabling the vehicle to move.
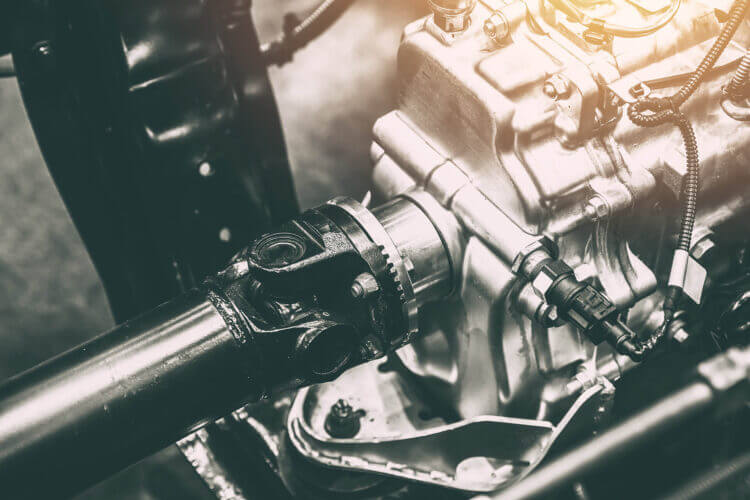
Simply put, u joints allow slight position changes between differential, transmission, and driveshaft. These components can’t be static while connected, since the differential moves separately from the rest of the mobile car. That’s why differential and transmission won’t stay aligned with one another constantly. The u-joint main function is to compensate for motion while keeping the driveshaft coupled and spinning without restraint.
Car engine and transmission are attached to the vehicle’s frame, but the rear axle swings up and down as you drive. With UJ, the rotational energy of the engine will be transmitted to the axle. Furthermore, the angle between the axle and transmission is constantly changing, and UJ is the part that keeps them connected. Without it, the driveshaft may fall off the auto while you are driving. That’s why, if your car needs fixing, don’t ignore the problem, especially if the issue is in u-joints.
Prior to replacing any vehicle components, you need to make sure you got the right replacement part. When it comes to u-joints, firstly identify the correct style because they can come in many forms, from winged and grooved to slotted and knurled. The best way to determine what kind of replacement you need is to remove the parts from your car and measure them.
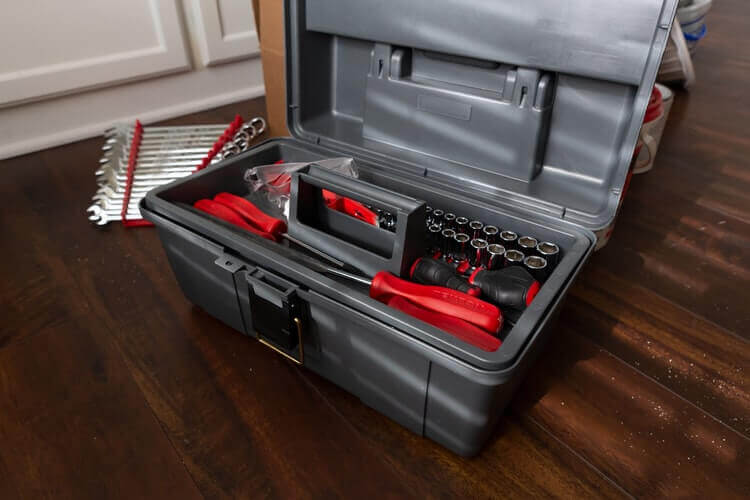
You can’t do this with your bare hands. That’s why, before getting down to business, make sure you have the right tools. The first thing you should obtain is a hammer. With it, you will knock the automotive piece out of the socket. With all the hitting, there will be some loud noises, so get ear mufflers to protect yourself. Furthermore, you will need a jack tool to lift part of your auto off the ground. Also, find jack stands, ratchets, some wrenches, and socket sets. Finally, get a grease gun and snap ring pliers, and you will be all set to tackle this fixing task.
You know better than anyone how your car runs and sounds, so it will be easy to tell if something is wrong with it. When you know what the failing UJ symptoms are, it will be clear when you should take action:
These are the five main signals of vehicle failure. To avoid completely losing the driveshaft, pay attention to the way your car runs and sounds. When you notice changes, no matter how slight, it is time to think about repairs.
Park your vehicle with e-brake on and grab the driveshaft. If you can move the driveshaft without turning the yoke on the differential, you got yourself a bad UJ. Also, you don’t have to drive slowly and pay attention to clinking sound. Hold the foot tight on the brake pad and shift from reverse to drive and vice versa. If there is a cluck under your car, it could mean that your UJ needs fixing.
Now when you know how important the UJ is, it is time to start repairs. Begin with the inspection. Even though the car should be checked out every time it receives a service of sorts, you should also inspect it before getting down to business.
Grab a driveshaft and try to move it. After that, look closely for impact damage, dents, or anything that can cause vibrations to your vehicle. If there is nothing odd on the surface that can cause your car to sound and run differently, get your tools. It is time to change UJ.
You are starting with the removal of the driveshaft, and to do that, you will need a jack stand, screwdriver, wrench set, and all protective equipment like gloves and goggles.
Lift up the car with a jack stand and make sure it is secure on it. Then mark the driveshaft position with a marker. This way, you will know exactly where it goes when you reinstall it. Take suitable wrenches and remove fasteners. They usually come in two pairs of nuts or bolts, and they are located at the rear where the differential is connected with the driveshaft. When you unscrew the fasteners, push the driveshaft down and forward, and then pull it out of the transmission. Be prepared for some oil dripping. You can use some old rags to wipe it off without making a mess.

Once again, you will need to inspect the car, just like you did when starting the repairs. Only this time, you will check out u-joints and their condition. When you pull out the driveshaft, try to move each joint fully, in every direction. They should move smoothly, but the bearing caps pressed to fit in the yoke should not budge. Pay attention to any signs of roughness or wear, because those are indicators that you need new UJ since they are not repairable. What did you notice? Is there a need for a new u-joint? If so, it is time for the replacement part of the fixing process.
This is it. It is time to replace a part and make your car run smoothly once again. Since you already obtained wrenches and screwdrivers, you should also gather around tools like hammer, ratchets, and sockets. With them, you will be fully equipped to change UJ without a problem.
Step 1: This is where you remove the old and broken u-joint. Use snap-rings or retainers to secure the bearing cups because they need to be removed next. Apply force with a hammer to knock UJ out of the position, just be careful not to damage the driveshaft. If you don’t want to use brute force, try the vise method. With it, you can press the bearing cups out.
Step 2: Installing the new UJ won’t be a problem if the new part is the same size as the broken one. If a new u-joint uses grease fittings, position it in a way where the fitting will be accessible with a grease gun. Use rags to clean the driveshaft yoke thoroughly. Make sure there is no dirt around it, and while you are at it, inspect it for damage. Next, you should remove caps from the new component and put it in the yoke. Press new caps into place in the yoke with vise and sockets. If you use a hammer, slowly hit it until the cap falls into place.
Step 3: Installing the snap-rings is the final step. Before you start, check UJ for free movement; if the new part feels tight, tap it gently with a hammer to free it up.

You are almost at the end. With the new UJ, all that is left is returning the driveshaft in its right position. Before you do that, get a clean rag and wipe the ends of the driveshaft clean. Lift the car part and align it with marks you made during the removal and plug it in the transmission and screw bolts tightly. Also, insert grease fitting and apply grease.
When you are positive that everything is where it should be, lower the car down. All that’s left is for you to check if there was any loss of the transmission fluid while the driveshaft was removed. If there was some leakage, don’t forget to refill the fluid.
You replaced UJ, but there are some things that can only be done and detected by professionals with high tech equipment. If you want to be sure everything is okay with your vehicle, scheduled maintenance at the local mechanic shop. They will make sure that there is nothing wrong with your car, meaning they will check your brake pads and replace them if that’s what your car needs or fix any other problem.

Are you a gear head that likes to tinker around vehicles? Maybe you are considering buying a used car and fixing it on your own? If that’s the case, you will need a professional car shipping company to deliver your new machine to you. With shipping options like open haulers and enclosed trailers, you don’t have to worry about your new machine’s safety. It will be delivered to you promptly so that you can enjoy the whole process of fixing it up and making it better.