Having bad, broken, fogged, or cracked taillights will not only earn you a ticket but lead you into a potentially dangerous situation. That’s why learning how to change a tail light is exceptionally important for every driver, veteran or newbie. Mastering this skill will save you the trouble of visiting the mechanic too often, and it will keep you safe on the road.
Before you get down to repairs, you should go over the different types of lights and their importance for your four-wheeler. To help you navigate this relatively simple DIY project, we made this universal guide that will answer the questions like What kind of tools do you need to repair your taillight? and What are the reasons tail lights fail?
When you’re driving, you are bound to get familiar with your car, its gadgets, and the vital parts. This is especially important if you have a knack for fixing things on your own. If you want to be your own mechanic, you have to know precisely how things function inside your vehicle.
Department of Transportation Motor Vehicle Administration identifies several types of lights:
When you know what type you need to replace, it will be easier to locate the right bulb. Before you replace the broken part, make sure you bought the one from the same category, with the exact nominal power and cap base.

Are you hyped about learning a new skill? Knowing your way around the car can come in handy when minor malfunctions happen, and that’s why learning how to replace a tail light bulb should be your next DIY project.
When it comes to car maintenance, this is a pretty easy thing to master, even though it is not on the top of priority lists for repairs. However, when you get to do it, be careful, because you can damage the vehicle and hurt yourself in the process if you are hasty.
Before you get to fix your car, there is one crucial thing you need to do – obtain all the right tools. Depending on the type of vehicle you have, the tools you need may vary, but in general, you cannot start anything before getting:
TL is a critical feature on every vehicle; they are especially necessary if you are on the road at night, twilight hours, or bad weather. Since they are essential for your safety, they should always work. However, like everything, they can break down. So what are the most common reasons TL doesn’t work?

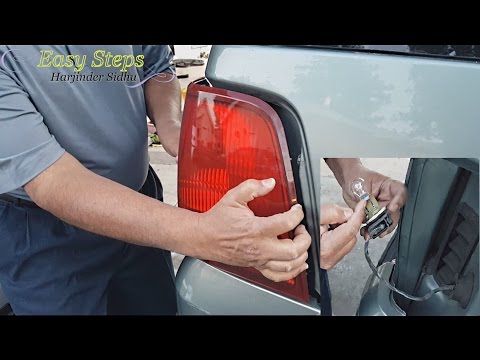
You learned all about why TL brakes and how important it is to your safety and auto functionality; now it is time for you to get to work. Pull out all the necessary tools, put the safety on, and begin by unscrewing the TL housing.
This is where all red, yellow, and white bubbles are stored, and many trucks and cars have one lens assembly for all of these. Get a screwdriver and loosen screws that keep it together. Try to keep the screws in one place like a cup or a bowl because you don’t want to lose them while working.
When nothing holds the assembly, you can pull it out of its hole. Keep in mind that it is attached to the car with the wiring. That’s why you shouldn’t pull on it too hard. When you have the assembly in your hands, the first part of the repairs is done.
When you have the assembly out of the car, you can see that the bulbs are fixed to one place with a plug screw into it. When you know which part you have to replace, follow the wires to it, pull it out, or unscrew it (this will depend on the model of your auto).
When you see a dead bulb, you can either pull it out or unscrew it and then remove it. When the broken part is out of the socket, put the new one in. All that’s left is retracing the steps until you put back everything the way it was in the beginning. Turn on the TL to check if it’s working. Now you can enjoy a legal and safe ride.
Dark trunks sound creepy, so you should not hesitate to replace bulbs on your own. The procedure is pretty straight forward, and it will be done in a few minutes. Start by disconnecting the battery with a socket wrench. Then open the trunk, and use the flathead screwdriver to push the bulb housing out. Wear the rubber gloves and move the screwdriver slowly. When the housing is out, you can replace the bulb and reverse engineer the whole process. When you finish reconnecting the battery, check to see if everything is working.
Are you wondering how to replace tail light bulbs before it is too late? If you want to prevent being without a light in your car’s trunk, pay attention to the signs indicating it is time for new bulbs:

Replacing taillight doesn’t necessarily have to mean changing the bulb. Sometimes, while you are driving, a small rock can hit your car and crack the lenses. Don’t panic when this happens because it is totally fixable; all you need is a lens repair kit. Depending on the damage, you can use two types of repairing techniques:
If you are frequently on the road, having a lens repair kit can save you from frequent trips to the mechanic. Keep in mind that these kits can be applied on many models from Toyota, Honda, and Ford to Plymouth, Dodge, and Chrysler.

Tackling repairs on your own will cost you anywhere between $30 and $250 of each TL assembly. Additionally, if you have a fancy car, the overall costs can be higher. However, if, for some reason, you can’t repair your TL on your own, the next best thing is calling a professional mechanic to do it for you.
Depending on the model and your four-wheeler’s make, you will be expected to pay anywhere between $200 and $500. Remember, the repairs will cost you more if you have a luxury or performance vehicle. You can also take advantage of the fact that your car is in the mechanic shop and schedule a routine check-up to make sure everything is in the best order.
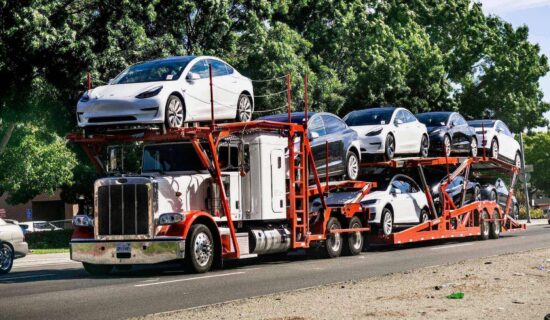
Some people like working on their vehicles, fixing them up, step by step, and making them run smoothly. If you are one of them, buying a used car to be your DIY fixing project is a way to go. Use those fixer-uppers to sharpen your tire-changing skills and freshen up your knowledge on replacing thermostats and U-joints.
No matter if you get your vehicle online or go through a dealer, you will need an auto transport company to bring it to you. The reputable car shipping company you hire should offer you open trailers or enclosed auto transport, and you can choose the one that suits your needs better. Also, take advantage of door to door auto transport and terminal to terminal car shipping options, and your machine will be delivered to you without any stress and complications.